Imperfectly Perfect: How to To Plant On An Impossible Site
Tough places to plant? Everyone has them. We might long for rich loam, perfect drainage and just the right amount of sun, but personally, I rarely get that lucky. I usually end up banging my shovel against rocks,roots, clumpy clay soil and trying to figure out what plants have a chance of surviving. I know some of you can relate, so I thought I'd write about a project I did recently where I had just about zero soil.
The Problem:
Here it is - a sweet little woodland garden I was asked to come up with a design for. My brain was spinning with ideas until I walked back there and started to dig.
I hit roots everywhere I stuck my shovel. There was no way to plant anything without destining it to a certain death. The two photos below tell the story.


I thought I might be able to sock in a few more ferns and some other shallow rooted plants, but after digging around it was clear I had nothing to work with.
The Solution:
Good Soil
Indestructible Plants
Mulch
The Soil:
I pondered the problem all winter and finally decided to truck in a few yards of soil - a mix of mushroom compost and topsoil. As you can see in the above photo, I had a fair amount of room between the trees. That was important, because you can't place extra soil around tree trunks or cover up the ground all around them without suffocating their roots. I was careful to confine the area where I put the soil and only raised the level to 6 inches.
I mounded up one small bed between several hemlocks and another along the fence line. Unplanted, they looked kind of silly - like a bunch of small graves!


The plants:
The thing to keep in mind when you're planting in limited soil is to choose perennials that don't require much moisture. It helps if they have shallow root systems that spread easily. Those that reseed are a bonus because they'll seed in the tough places you can't get your shovel into.
As the garden was to be viewed from a distance, I massed the plants in big groups, around 9-12 together and repeated them in both beds. I limited the varieties because the garden was small and I didn't want it to look too busy.
Eurybia divaricata (Wood aster)
Polemonium reptans (Jacobs ladder)
Adiantum pedatum (Maidenhair fern)
Dryopteris felix mas (Male fern)
Aquilegia (Columbine)
Polyganum odoratum 'Variegatum' (Variegated Solomon Seal)
Thanks to the extra soil, the plants went in easily. Digging got a little tough along the edges of the beds, so I placed the Solomon Seal and ferns in those areas - they'll grow just about anywhere. Here's what it looked like right after I planted it. You can see that I added to the existing ferns (Dryopteris felix mas) that were already there.

Plant profiles:
I knew I wouldn't have color all the time, so I went for textural combinations like this Variegated Solomon Seal and Maidenhair Fern - an indestructible duo for shade!

Solomon Seal, Polyganum odoratum 'Variegatum' has lovely variegated leaf and sweet little bell shaped white blossoms that flower in early May. It has a shallow rhizomatous root system and spreads quickly in shady areas.

Reseeders were at the top of the list. The mounded beds provide moist rich soil that will give these Aquilegia (Columbine) a good start. I'm hoping they'll jump around and naturalize themselves once they're established.

Ditto for getting Polemonium reptans (Jacobs ladder) up and running. It has lovely blue flowers that reseed and spread readily.

Wood Asters (Eurybia divaricata) are found naturally in open woods and at the edges of woodlands, so I thought they'd be a good fit. They flower in late summer/early fall.

Mulch: Keeping the soil in place
In addition to keeping in moisture, I needed mulch to keep the mounds from washing down. After planting I applied about 3 inches of natural shredded bark mulch on them to secure the soil. The shredded bark has a fine crisscross texture that helps hold the soil in place. Once the root systems of the plants are established, they'll keep the beds intact.
Care:
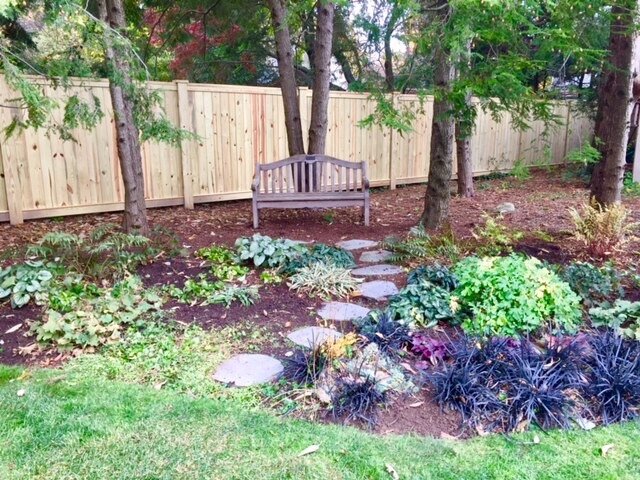
Depending on rainfall, watering 2-3 times a week is sufficient for a planting that is shaded like this one. If it was in bright sun, I'd water it every other day to keep it from drying out. Mulch will help hold in the moisture and keep the weeds down until the plants have matured. This is what it looked like when I was finished.
There are plenty of other perennials I could have used and still might, depending on how successful I am with the ones I just planted. But for right now, I feel like I won the battle. When the going gets tough, the tough get going right? Please respond and share, I'd love to hear from some of you with your problem areas or ideas!
